Posted on Leave a comment

Small Garage? Here’s How to Make It Look Bigger, Brighter, and Better

A small garage doesn’t have to feel cramped or limiting.

In fact, some of the best-looking garages are smaller spaces that have been designed correctly.

The difference isn’t size—it’s how the space is structured, how light is used, and how visual clutter is controlled.

When those three things are handled properly, even a tight garage can feel open, clean, and intentionally built.

1. Use Bright, Even Lighting to Eliminate Shadow Zones

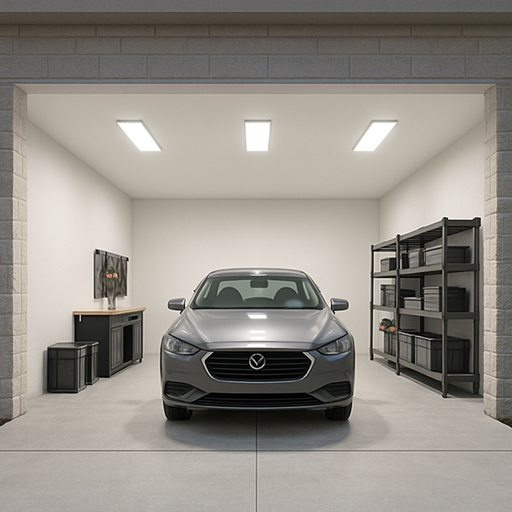
The fastest way to make a small garage feel even smaller is uneven lighting.

Most garages rely on a single light source, which creates:

  • dark corners
  • heavy shadows
  • inconsistent visibility

These shadows visually “shrink” the space by breaking it into sections.

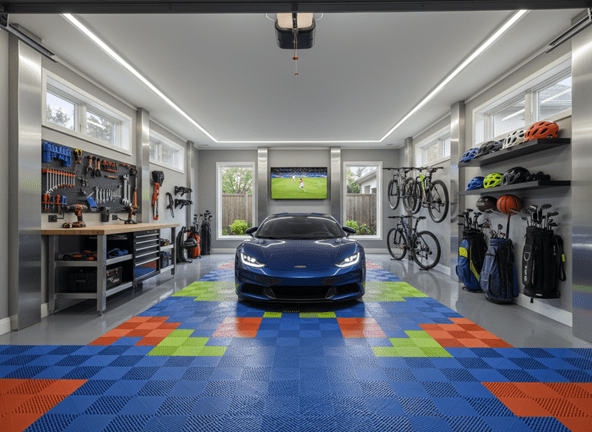
When lighting is evenly distributed across the ceiling, those shadow zones disappear—and the entire garage immediately feels more open.

Why this matters:
Your eyes interpret brightness as space. The more evenly lit the room is, the larger it feels.

How to approach it:

  • aim for full coverage, not just brightness in one area
  • eliminate dark edges and corners
  • keep lighting consistent from front to back

Pro tip:
If your garage looks smaller at night than during the day, your lighting layout is the issue—not the space itself.

The foundation of any upgrade starts with strong garage lighting ideas, especially in smaller spaces.


2. Build Vertically (Not Outward)

In small garages, floor space is your most valuable asset.

One of the most common mistakes is using that space for storage—stacking bins, tools, and equipment outward instead of upward.

Why this matters:
Anything sitting on the floor reduces visible space, which makes the garage feel tighter and more cluttered.

What works better:

  • vertical wall storage
  • mounted systems
  • keeping the floor as open as possible

Real impact:
When your floor is clear, your garage instantly feels larger—even if nothing else changes.

Pro tip:
If you can see more floor, your garage will always feel bigger.

small garage storage vertical wall organization


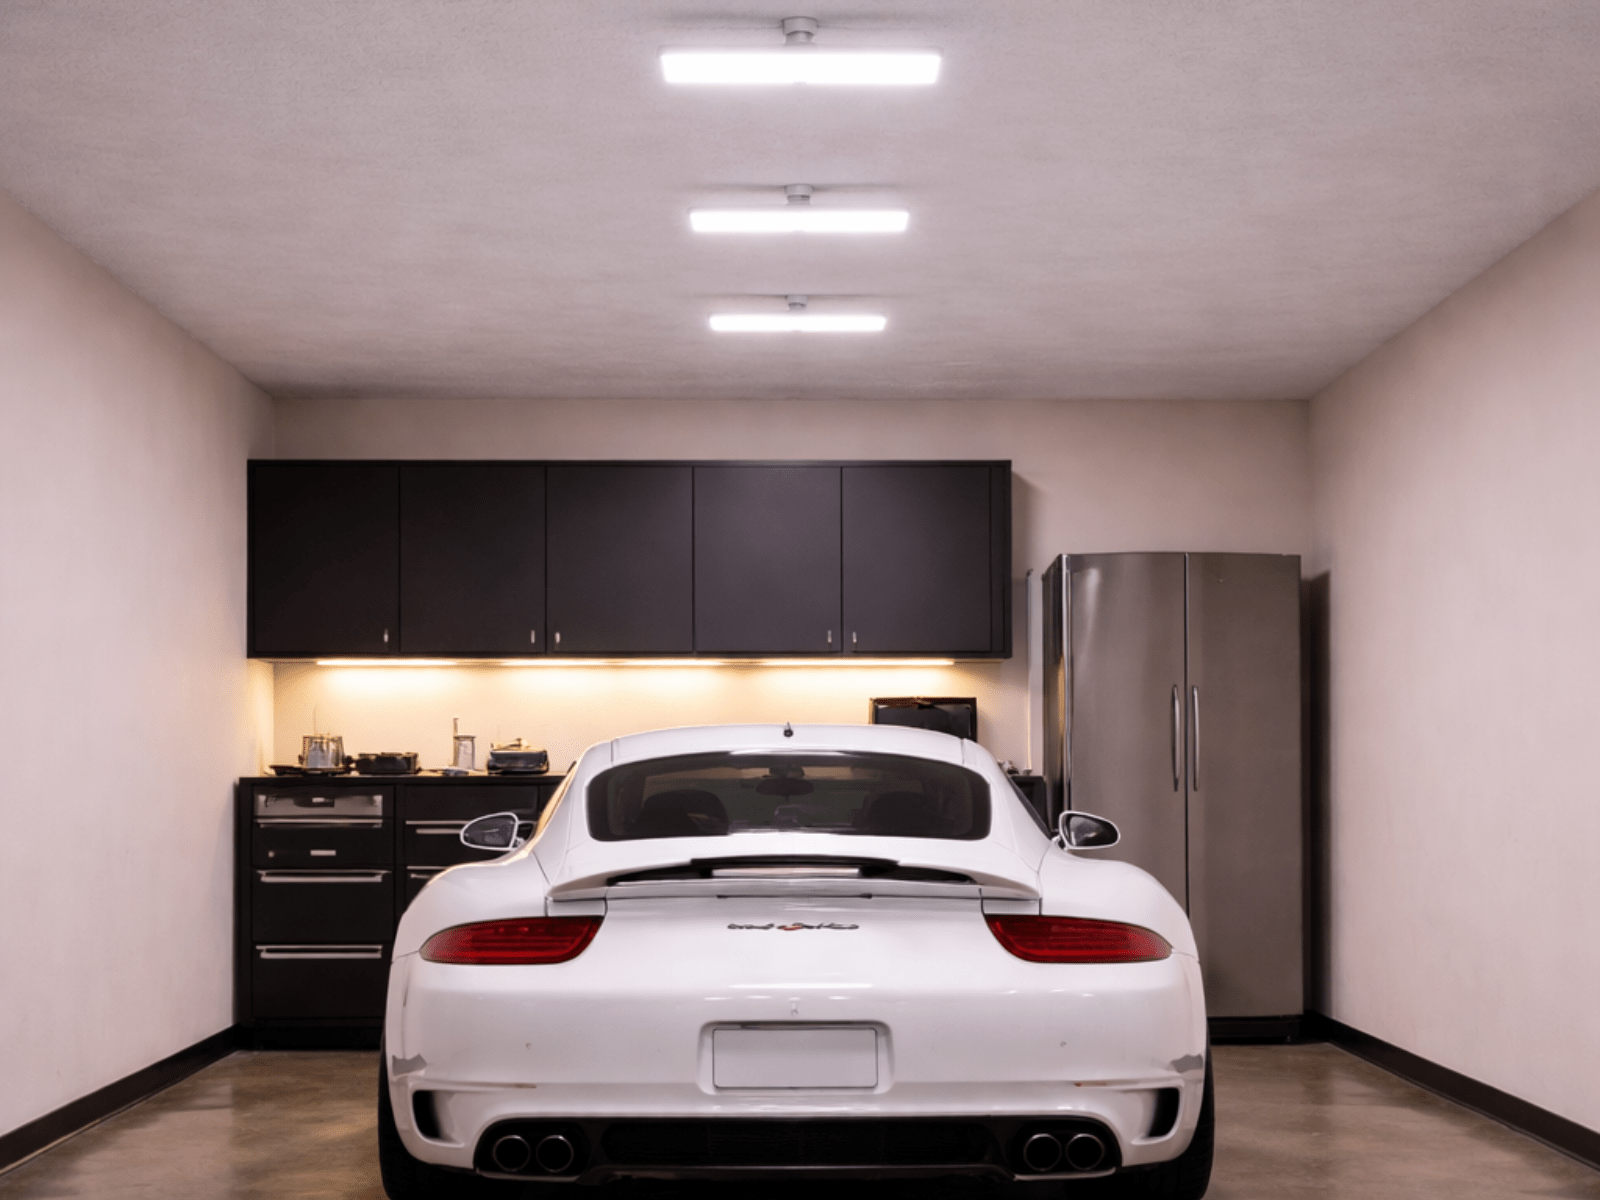
3. Simplify Your Color Palette (Visual Noise Shrinks Space)

Color plays a bigger role in perception than most people realize.

When a garage has too many competing colors—tools, bins, walls, flooring—it creates visual noise, which makes the space feel chaotic and smaller.

Why this matters:
Your brain has to process more information, which makes the space feel crowded.

What works best:

  • neutral base tones (black, gray, white)
  • minimal accent colors
  • consistency across surfaces

Real impact:
A consistent color palette makes the garage feel calmer, cleaner, and more spacious.

Pro tip:
If everything stands out, nothing looks intentional.


4. Use Reflective Surfaces to Amplify Light

Lighting alone doesn’t determine brightness—your surfaces play a major role.

Matte, dark, or unfinished surfaces absorb light, while reflective surfaces bounce it back into the space.

Why this matters:
In a small garage, you need to maximize every bit of light you have.

What helps most:

  • clean or coated floors
  • smooth wall finishes
  • organized, uncluttered surfaces

Real impact:
Reflective environments can make a garage feel significantly brighter without adding more fixtures.

Pro tip:
If your lighting feels underwhelming, your surfaces may be absorbing it instead of reflecting it.

small garage lighting setup bright even lighting


5. Keep the Floor Open (This Changes Everything)

This is one of the simplest—but most powerful—garage space optimization strategies.

When the floor is crowded, the garage feels tight. When the floor is open, the garage feels larger.

Why this works:
Open floor space creates uninterrupted visual flow, which makes the room feel bigger than it actually is.

What to avoid:

  • loose items sitting around
  • bulky storage taking up ground space
  • unnecessary equipment

Real impact:
Clearing the floor often makes a bigger difference than adding new features.

Pro tip:
Before buying anything new, remove or relocate what’s already taking up space.

Avoid these common garage design mistakes that can make a small garage feel even tighter.


6. Add Depth With Layered Lighting

Flat lighting makes small spaces feel boxed in.

Layered lighting—using multiple levels or angles—adds depth and dimension, which makes the garage feel more dynamic.

Why this matters:
Depth tricks your eye into perceiving more space.

How it works:

  • overhead lighting for full coverage
  • additional lighting to create contrast and visual separation

Real impact:
Instead of feeling like a single flat room, your garage starts to feel more expansive and designed.

Pro tip:
If everything is lit the same way, the space will feel flat. Variation creates dimension.


7. Design With Intent (Not Just Function)

Most small garages feel cramped because they’re designed only for function—not for how they look or feel.

A well-designed garage considers:

  • spacing
  • alignment
  • visual balance

Why this matters:
Intentional design creates structure, and structure makes a space feel controlled and open.

What this looks like in practice:

  • aligned storage
  • consistent lighting layout
  • clean, repeatable patterns

Pro tip:
A small garage that’s intentionally designed will always feel bigger than a large one that isn’t.

If you’re planning a full upgrade, this garage checklist will help you avoid many costly mistakes.

small garage lighting setup bright even lighting


Final Thought

A small garage isn’t a limitation—it’s a design challenge.

And when it’s done right, it often ends up looking cleaner, sharper, and more refined than larger spaces.

In almost every case, the turning point comes down to how lighting, layout, and visual control are handled together.

If you’re upgrading a smaller space, start with lighting that’s designed to maximize coverage and eliminate shadows

Posted on Leave a comment

Top 5 Garage Design Mistakes That Are Ruining Your Space (And How to Fix Them)

Most garages don’t look bad because of what they’re missing—they look bad because of a few critical mistakes that quietly ruin the entire space. You can spend money on upgrades, tools, or storage, but if these foundational issues aren’t addressed first, your garage will never feel clean, cohesive, or “finished.” The good news: once you understand what’s holding your setup back, the fixes are straightforward—and the results are immediate.

1. Poor or Uneven Lighting (The #1 Problem in Most Garages)

Lighting is the most common—and most damaging—mistake in garage design.

Most garages rely on a single overhead bulb or poorly spaced fixtures. This creates:

  • dark corners
  • harsh shadows
  • inconsistent visibility across the space

Even if everything else is dialed in, bad lighting will make your garage feel dull and incomplete.

Why this matters:
Lighting controls how every surface is perceived. Your car’s finish, your walls, your tools—all of it depends on how light hits them.

Uneven lighting breaks that consistency and instantly lowers the overall quality of the space.

How to fix it:

  • Focus on even light distribution across the entire ceiling
  • Eliminate shadow zones
  • Use lighting designed to fully cover the space—not just parts of it

Pro tip:
If your garage looks different depending on where you stand, your lighting layout isn’t working.

garage lighting mistakes uneven lighting dark garage setup


2. Treating Storage as “Out of Sight, Out of Mind”

A lot of garages technically have storage—but it’s not organized in a way that improves the space.

Stacked bins, random shelves, and overloaded corners create visual clutter, even if everything is “put away.”

Why this matters:
Your garage isn’t just functional—it’s visual. Disorganized storage breaks the clean lines that make a garage feel intentional.

What happens when this goes wrong:

  • the space feels smaller than it is
  • your eye has nowhere to settle
  • everything starts to feel chaotic

How to fix it:

  • move storage vertically instead of stacking outward
  • group similar items together
  • create clean, repeatable patterns (not randomness)

Pro tip:
If your storage draws attention to itself, it’s working against your design—not helping it.


3. No Clear Design Direction (Mixing Too Many Styles)

This is one of the most overlooked garage design mistakes.

A garage with no clear direction—mixing colors, materials, and styles—ends up feeling scattered and unfinished, even if each individual piece is high quality.

Why this matters:
Consistency is what creates a premium look. When everything feels like it belongs together, the space feels intentional.

Common issues:

  • mismatched colors (tools, bins, walls, lighting)
  • mixing modern and outdated elements
  • no defined “look” or theme

How to fix it:

  • choose a base palette (black, gray, white works best)
  • limit accent colors
  • keep finishes consistent across the space

Pro tip:
Before adding anything new, ask: “Does this match the rest of the garage?” If not, it will stand out in the wrong way.

Many of these issues start with poor garage lighting ideas and uneven layouts.

garage lighting mistakes uneven lighting dark garage setup


4. Ignoring the Floor (The Most Underrated Element)

The garage floor is one of the largest visible surfaces in the entire space—and one of the most neglected.

Stained, cracked, or dull concrete absorbs light and makes everything feel darker and less refined.

Why this matters:
Your floor directly affects how light reflects throughout the garage. A poor floor finish can cancel out even a strong lighting setup.

What happens when this is ignored:

  • lighting feels weaker than it actually is
  • the space looks older and less maintained
  • reflections (especially from your car) look dull

How to fix it:

  • deep clean as a starting point
  • consider coatings that reflect light and improve durability

Pro tip:
If your lighting upgrade didn’t have the impact you expected, your floor is often the reason.


5. Using Low-Quality Fixtures and Materials

This mistake is subtle—but it makes a big difference.

Cheap lighting, weak materials, and inconsistent finishes tend to stand out immediately, especially once everything else is cleaned up.

Why this matters:
As your garage improves, the low-quality elements become more noticeable—not less.

garage lighting mistakes uneven lighting dark garage setup

What happens:

  • lighting looks uneven or underpowered
  • materials wear out faster
  • the space never feels fully “finished”

How to fix it:

  • prioritize fewer, higher-quality upgrades
  • focus on elements that impact the entire space (especially lighting)
  • choose products designed specifically for garage environments

Pro tip:
Upgrading one key element properly will do more for your garage than multiple cheap upgrades combined.


Final Thought

Most garage upgrades don’t fail because of effort—they fail because the fundamentals weren’t handled first.

When you fix the core issues—especially lighting, layout, and consistency—everything else starts to fall into place.

A well-designed garage doesn’t just look better. It feels better to be in, work in, and show off.

If you’re planning a full upgrade, these garage makeover ideas will help you avoid these mistakes entirely.

The best setups aren’t just bright—they’re intentional. The difference comes down to choosing lighting designed specifically for garage environments.

If you’re looking to fix the foundation of your setup, start with lighting that’s built specifically for garages

Posted on Leave a comment

10 Garage Lighting Ideas That Instantly Upgrade Your Space

If your garage feels dull or unfinished, lighting is usually the missing piece. The right setup doesn’t just improve visibility—it completely transforms how your space looks and feels.

1. Structured Ceiling Lighting Layouts

A structured lighting layout (clean, evenly spaced patterns across the ceiling) creates a polished, intentional look.

This matters because random or uneven lighting creates shadows and visual imbalance, which makes even a clean garage feel cluttered.

When lighting is laid out in a consistent pattern, it:

  • eliminates dark zones
  • improves visibility across the entire space
  • creates that “showroom” effect people notice immediately

Pro tip:
Measure your ceiling and plan spacing before installing anything. Symmetry matters more than people expect.


2. High-Output LED Fixtures

Not all LED lighting is equal. Low-output fixtures often look bright at first—but once installed, they leave dull areas and weak coverage.

A properly lit garage should feel evenly illuminated from corner to corner—not spotlighted.

Higher-output lighting:

  • reduces eye strain
  • improves visibility when working
  • enhances reflections on your car and floor

Pro tip:
Look at total light output (lumens), not just wattage. That’s where most people go wrong.


3. Layered Lighting (Not Just Overhead)

One of the biggest mistakes is relying only on ceiling lights.

Layered lighting—like adding illumination under cabinets or along walls—creates depth and makes the space feel intentional.

Without it, garages tend to look flat and unfinished.

Pro tip:
Think in layers: overhead for visibility, lower lighting for atmosphere and detail.


4. Wall-Focused Lighting

Lighting that hits your walls instead of just the floor changes how the entire room feels.

It:

  • highlights textures
  • makes the space feel wider
  • removes the “boxy” look most garages have

Pro tip:
If your walls look dull, your lighting is probably too vertical. Adjust angles or placement.


5. Even Light Distribution

This is where most garages fail.

You can have bright lights—but if they’re poorly spaced, you’ll still get:

  • dark corners
  • harsh shadows
  • uneven visibility

Even distribution is what creates that clean, professional finish.

Pro tip:
Stand in different parts of your garage and look for shadow zones. That’s where your layout needs work.

A strong upgrade always starts with your garage lighting ideas before moving into layout and finishes.


6. Color Temperature (Why It Matters More Than You Think)

Lighting color dramatically affects how your garage feels.

Warm lighting (yellow tones):

  • feels dimmer
  • makes the space look dated

Cool white lighting:

  • feels brighter
  • makes surfaces look cleaner
  • enhances contrast and detail

Pro tip:
If your garage doesn’t feel “crisp,” your color temperature is likely too warm.


7. Highlight Zones for Visual Impact

A standout garage doesn’t treat every area the same.

Highlighting specific zones—like your car or workbench—adds depth and focus.

This is what creates that “designed” look instead of just “lit.”

Pro tip:
If everything is equally bright, nothing stands out. Contrast creates interest.


8. Smart Lighting Control

Being able to adjust brightness changes how you use your space.

Bright for working. Slightly dimmed for a cleaner, ambient look.

Pro tip:
Even a simple dimmer setup can dramatically improve how your garage feels at night.


9. Reflective Surfaces + Lighting

Lighting doesn’t work alone—it interacts with your surfaces.

Glossy or coated floors reflect light back into the space, doubling the visual effect.

Pro tip:
If your lighting feels weak, your surfaces might be absorbing it instead of reflecting it.


10. Designing With the End Result in Mind

The best garages don’t just “add lights”—they’re designed around how the space should feel.

Clean. Bright. Intentional.

That only happens when lighting is treated as a core part of the build—not an afterthought.

You can also follow a full garage setup checklist to make sure nothing is missed.

The best setups aren’t just bright—they’re intentional. The difference comes down to choosing lighting designed specifically for garage environments.

Explore lighting designed for real garage builds here

Posted on Leave a comment

The Ultimate Guide to Garage Lighting Ideas (2026): Design, Layout, and Setup

Most people underestimate how much lighting affects their garage.

They focus on tools, storage, or flooring—but ignore the one thing that controls how everything looks: light.

The truth is simple:

The difference between a basic garage and a showroom-level setup almost always comes down to lighting.

The same garage—with the same layout—can feel:

dark and cluttered or clean, sharp, and high-end

…depending entirely on how the lighting is designed.

This guide breaks down everything you need to know—from layout to brightness to design—so you can build a garage that actually looks and feels complete.

💡 1. What Makes a Great Garage Lighting Setup?

A great garage lighting setup isn’t just about brightness—it’s about control and consistency.

Most garages fail because they rely on:

  • one central light source
  • uneven fixture placement
  • low-output lighting

This creates shadow zones and visual inconsistency.


🔑 The 3 Things Every Setup Needs

1. Even Light Distribution

Light should cover the entire garage—not just the center.

2. Minimal Shadows

Shadows make your garage feel smaller and less refined.

3. Consistent Brightness

No harsh bright spots or dim corners.


Expert Insight:
Your goal isn’t to “light the garage”—it’s to eliminate contrast across the entire space.


🧱 2. Garage Lighting Layout (Where Most People Go Wrong)

If there’s one place people mess up—it’s layout.

You can have great lights, but if they’re poorly arranged, the result will still feel off.


🔲 Structured Layout vs Random Placement

A structured layout:

  • creates symmetry
  • improves visual flow
  • eliminates dead zones

Random placement:

  • causes uneven lighting
  • creates visual imbalance

📐 How to Think About Layout

Instead of:

“Where can I fit lights?”

Think:

“How do I evenly cover the entire ceiling?”


Best Practices:

  • space lights evenly
  • align them in clean patterns
  • avoid clustering in one area

Pro tip:
Stand in your garage and look for shadow zones—those are layout failures, not brightness issues.

And thinking about a garage makeover?  This guide will walk you through options.  

modern garage LED lighting setup with even ceiling layout


💡 3. Choosing the Best Garage Lighting Type

Not all lighting works well in a garage environment.

The key is choosing lighting that provides:

  • wide coverage
  • consistent brightness
  • clean visual output

🔍 What to Look For in Garage LED Lighting

1. High Lumen Output

More lumens = better coverage.

2. Wide Beam Spread

Prevents spotlighting and uneven light.

3. Clean Light Color

Cool white lighting enhances clarity and detail.


Important:
Wattage doesn’t equal brightness—lumens do.

Garage lighting tips and tricks


🎨 4. Color Temperature (Why Your Garage Might Look Dull)

Color temperature has a massive impact on how your garage feels.


Warm vs Cool Lighting

Warm Light (Yellow Tones)

  • feels dimmer
  • looks outdated
  • reduces clarity

Cool White Light

  • looks brighter
  • feels cleaner
  • enhances reflections

Recommended Range:

👉 5000K–6500K


Pro tip:
If your garage doesn’t feel “crisp,” your lighting color is likely too warm.

modern garage LED lighting setup with even ceiling layout


🧠 5. Layered Lighting (The Secret to a High-End Look)

Most garages rely on a single lighting layer—overhead.

That’s why they feel flat.


What Is Layered Lighting?

Using multiple light sources at different levels:

  • ceiling lighting (main coverage)
  • lower or directional lighting (depth and focus)

Why It Works:

  • adds dimension
  • creates contrast
  • makes the space feel designed

Expert Insight:
Flat lighting makes your garage look like storage. Layered lighting makes it feel like a showroom.  As in the image below, the upper “main” lighting lights the room, but the side lighting “accents” the room.  

Garage lighting and design

If you’re looking for amazing lighting options for your garage and looking to take your garage to the next level, check out the Lit Garages lighting packages here.  


🚗 6. Lighting for Visual Impact (Making Your Garage Stand Out)

Lighting isn’t just functional—it’s visual.

A well-lit garage draws attention to what matters.


Highlight Zones

Use lighting to emphasize:

  • your car
  • workbench areas
  • feature walls

Why This Matters:

If everything is equally lit, nothing stands out.


Pro tip:
Create contrast—not everything should have the same intensity.

modern garage LED lighting setup with even ceiling layout
Lit Garages 2 car garage product image

🪞 7. How Surfaces Affect Lighting

Lighting doesn’t work alone—it interacts with your environment.


Reflective vs Absorbing Surfaces

Reflective Surfaces:

  • amplify light
  • make the space feel brighter
  • increase depth

Absorbing Surfaces:

  • dull lighting
  • reduce visibility
  • make the space feel smaller

What Helps Most:

  • clean floors
  • smooth wall finishes
  • uncluttered surfaces

Pro tip:
If your lighting feels weak, your surfaces may be working against it.


🧰 8. Common Garage Lighting Mistakes (Avoid These)


❌ Uneven Layout

Leads to shadows and imbalance

❌ Not Enough Coverage

Creates dim zones

❌ Wrong Color Temperature

Makes the garage feel outdated

❌ Treating Lighting as an Afterthought

Instead of a foundation


Expert Insight:
Most lighting problems aren’t caused by bad products—they’re caused by poor planning.

Take a look at these common garage design mistakes and how to avoid them.

garage lighting and cool designs


🧱 9. Designing Your Garage Around Lighting

Here’s where most people get it backwards.

They:

  • build the garage
  • then add lighting

The better approach:

Design your garage with lighting as the foundation.


Why This Works:

  • everything aligns visually
  • no retrofitting issues
  • better overall result

🔥 10. What a Complete Garage Lighting Setup Looks Like

A complete setup includes:

  • full ceiling coverage
  • consistent brightness
  • clean layout
  • minimal shadows
  • intentional design

When all of these come together, your garage:

  • looks bigger
  • feels cleaner
  • stands out immediately

Check out the checklist we created for making an amazing garage

modern garage LED lighting setup with even ceiling layout


🧠 Final Thoughts: Why Lighting Is the First Upgrade You Should Make

Every major garage transformation starts with lighting.

Because once lighting is right:

  • everything else looks better
  • upgrades feel more impactful
  • the space feels complete
Posted on

Garage Flooring Options

Garage Flooring Options: Which One Is Best for Your Ultimate Man Cave?

Why Flooring Matters in Your Garage

Let’s be real: Garage floors take a beating—oil drips, heavy tools, muddy boots, and the occasional dropped wrench. But the right flooring makes your garage look awesome, protects your investment, and is way easier to clean.

Top Garage Flooring Choices for 2025

  • Epoxy Coating:
    • Super durable, glossy finish, and resists stains like a champ. Great for DIYers who want a pro look.
  • Interlocking Tiles:
    • Fast to install, tons of color options, and easy to replace if you damage one. Perfect for custom designs.
  • Roll-Out Mats:
    • Quick fix for ugly concrete. Just roll them out and you’re done—great for renters or anyone in a hurry.
  • Polished Concrete:
    • Sleek, modern, and low-maintenance, but can be slippery when wet.

What’s the Best Choice for You?

  • Want something that looks wild? Go for interlocking tiles in your favorite colors.
  • Need max durability? Epoxy is king.
  • Just want to hide stains? A roll-out mat gets the job done fast.

Common Questions

Is garage flooring DIY-friendly? – Epoxy and tiles are pretty doable for handy folks. Polished concrete is best left to pros.

Will it really make a difference? – 100%! Your garage will look better, feel cleaner, and be easier to maintain.

Ready to Upgrade Your Garage Floor?

At Man’s Garage we DON’T help you pick and install the perfect floor for your man cave dreams, BUT we do offer the best man cave lighting on the market.   Let’s make your garage the best room in the house—contact us today!

Posted on

Lit Garages Story

Brighten Up Your Workspace: The Man’s Garage Story and Why Lighting Matters

Is your garage more like a man-cave or a bat-cave? If your answer is closer to the latter, you’re not alone! Most garages are plagued by dim lighting, making it tough to tackle any project—whether you’re wrenching on your ride, building a workbench masterpiece, or just searching for that one tool that always disappears.

The Spark Behind Man’s Garage

Here at Man’s Garage, we’re on a mission: to help guys everywhere create the ultimate workspace. The idea started when our founder, Joe Cullumber, realized that his own garage lighting just wasn’t cutting it. With years of experience in commercial lighting, Joe decided to swap out the sad, flickering bulbs for a commercial-grade linear highbay fixture. The result? A garage so bright, it practically begged for a project to get started!

Why Lighting Matters

Let’s face it—good lighting isn’t just about seeing what you’re doing (though that’s a big part of it). It’s about transforming your garage into a place you actually want to spend time in. Whether you’re a weekend mechanic, a DIY king, or just someone who appreciates a well-organized workspace, the right lighting makes all the difference.

  • Boosts Productivity: No more squinting or working in the shadows. See every nut, bolt, and detail clearly.
  • Enhances Safety: Fewer accidents happen when you can see what you’re doing.
  • Elevates the Vibe: A well-lit garage just feels cooler. Period.

The Ultimate Garage Package

At Man’s Garage, we’re not just selling lights—we’re helping you upgrade your entire experience. Our garage lighting packages are designed for guys who want to take their space to the next level. Easy to install, built to last, and bright enough to impress even the pickiest DIYer.

Ready to Level Up?

If you’re ready to turn your garage into the envy of the neighborhood, let’s chat! Check out our packages and see how easy it is to transform your workspace from cave to kingdom.

Stay tuned for more tips, stories, and garage inspiration—because every man deserves a garage that works as hard as he does!